基于XML+注解方式的SSM整合(简单),
分享于 点击 16605 次 点评:65
基于XML+注解方式的SSM整合(简单),
一、搭建整合环境
1. 整合的思路
1. 先搭建整合的环境
2. 先把Spring的配置搭建完成
3. 再使用Spring整合SpringMVC框架
4. 最后使用Spring整合MyBatis框架
框架大致结构图:

语句:
create database ssm;
use ssm;
 create table account(
    id int primary key auto_increment,
    name varchar(20),
    money double
);
3. 创建maven的工程并导入相应依赖
<dependencies>
        <!--Junit-->
        <dependency>
            <groupId>junit</groupId>
            <artifactId>junit</artifactId>
            <version>4.12</version>
        </dependency>
        <!--Junit整合Spring-->
        <dependency>
            <groupId>org.springframework</groupId>
            <artifactId>spring-test</artifactId>
            <version>5.2.0.RELEASE</version>
        </dependency>

        <!--数据库驱动-->
        <dependency>
            <groupId>mysql</groupId>
            <artifactId>mysql-connector-java</artifactId>
            <version>5.1.46</version>
        </dependency>

        <!--数据库连接池-->
        <dependency>
            <groupId>com.mchange</groupId>
            <artifactId>c3p0</artifactId>
            <version>0.9.5.3</version>
        </dependency>

        <!--servlet jsp-->
        <dependency>
            <groupId>javax.servlet</groupId>
            <artifactId>servlet-api</artifactId>
            <version>2.5</version>
        </dependency>
        <dependency>
            <groupId>javax.servlet.jsp</groupId>
            <artifactId>jsp-api</artifactId>
            <version>2.2</version>
        </dependency>

        <!--mybatis-->
        <dependency>
            <groupId>org.mybatis</groupId>
            <artifactId>mybatis</artifactId>
            <version>3.5.3</version>
        </dependency>
        <!--MyBatis整合spring-->
        <dependency>
            <groupId>org.mybatis</groupId>
            <artifactId>mybatis-spring</artifactId>
            <version>2.0.3</version>
        </dependency>

        <!--spring-->
        <dependency>
            <groupId>org.springframework</groupId>
            <artifactId>spring-webmvc</artifactId>
            <version>5.2.0.RELEASE</version>
        </dependency>
        <!--spring 织入-->
        <dependency>
            <groupId>org.aspectj</groupId>
            <artifactId>aspectjweaver</artifactId>
            <version>1.9.4</version>
        </dependency>
        <!--springjdbc-->
        <dependency>
            <groupId>org.springframework</groupId>
            <artifactId>spring-jdbc</artifactId>
            <version>5.2.0.RELEASE</version>
        </dependency>
        <!--jstl-->
        <dependency>
            <groupId>javax.servlet</groupId>
            <artifactId>jstl</artifactId>
            <version>1.2</version>
        </dependency>
        <!--spring事物-->
        <dependency>
            <groupId>org.springframework</groupId>
            <artifactId>spring-tx</artifactId>
            <version>5.2.0.RELEASE</version>
        </dependency>

        <!--lombok-->
        <dependency>
            <groupId>org.projectlombok</groupId>
            <artifactId>lombok</artifactId>
            <version>1.18.10</version>
        </dependency>

        <!--日志包-->
        <dependency>
            <groupId>log4j</groupId>
            <artifactId>log4j</artifactId>
            <version>1.2.17</version>
        </dependency>

        <dependency>
            <groupId>org.slf4j</groupId>
            <artifactId>slf4j-api</artifactId>
            <version>1.7.28</version>
        </dependency>

        <dependency>
            <groupId>org.slf4j</groupId>
            <artifactId>slf4j-log4j12</artifactId>
            <version>1.7.28</version>
        </dependency>
    </dependencies>
如果出现静态资源导出问题添加下面代码:
<build>
        <!--静态资源导出问题-->
        <resources>
            <resource>
                <directory>src/main/java</directory>
                <includes>
                    <include>**/*.properties</include>
                    <include>**/*.xml</include>
                </includes>
                <filtering>false</filtering>
            </resource>
            <resource>
                <directory>src/main/resources</directory>
                <includes>
                    <include>**/*.properties</include>
                    <include>**/*.xml</include>
                </includes>
                <filtering>false</filtering>
            </resource>
        </resources>
    </build>
二、框架代码的编写
创建jdbcConfig.properties文件:
jdbc.driver=com.mysql.jdbc.Driver
jdbc.url=jdbc:mysql://localhost:3306/ssm?useSSL=true
jdbc.username=root
jdbc.password=123456
创建applicationContext.xml文件:
<?xml version="1.0" encoding="UTF-8"?>
<beans xmlns="http://www.springframework.org/schema/beans"
       xmlns:xsi="http://www.w3.org/2001/XMLSchema-instance"
       xmlns:context="http://www.springframework.org/schema/context"
       xmlns:tx="http://www.springframework.org/schema/tx"
       xmlns:aop="http://www.springframework.org/schema/aop"
       xsi:schemaLocation="http://www.springframework.org/schema/beans
        http://www.springframework.org/schema/beans/spring-beans.xsd
        http://www.springframework.org/schema/context
        http://www.springframework.org/schema/context/spring-context.xsd
        http://www.springframework.org/schema/tx
        http://www.springframework.org/schema/tx/spring-tx.xsd
        http://www.springframework.org/schema/aop
        http://www.springframework.org/schema/aop/spring-aop.xsd">
    <!--开启注解的扫描,只处理业务层和dao层,controller不需要spring去处理-->
    <context:component-scan base-package="com.wsl">
        <!--配置哪些不扫描-->
        <context:exclude-filter type="annotation" expression="org.springframework.stereotype.Controller"/>
    </context:component-scan>

    <!-- 加载配置文件 -->
    <context:property-placeholder location="classpath:jdbcConfig.properties"/>

    <!-- 配置数据源 -->
    <bean id="dataSource" class="com.mchange.v2.c3p0.ComboPooledDataSource">
        <property name="driverClass" value="${jdbc.driver}"></property>
        <property name="jdbcUrl" value="${jdbc.url}"></property>
        <property name="user" value="${jdbc.username}"></property>
        <property name="password" value="${jdbc.password}"></property>
    </bean>

    <!-- 配置 MyBatis 的 Session 工厂 -->
    <bean id="sqlSessionFactory" class="org.mybatis.spring.SqlSessionFactoryBean">
        <!-- 数据库连接池 -->
        <property name="dataSource" ref="dataSource"/>
        <!-- 加载 mybatis 的全局配置文件 -->
        <property name="configLocation" value="classpath:mybatis-config.xml"/>
    </bean>

    <!-- 配置 Mapper 扫描器 -->
    <bean class="org.mybatis.spring.mapper.MapperScannerConfigurer">
        <property name="basePackage" value="com.wsl.mapper"/>
    </bean>

    <!-- 配置事务管理器 -->
    <bean id="transactionManager"
          class="org.springframework.jdbc.datasource.DataSourceTransactionManager">
        <property name="dataSource" ref="dataSource"></property>
    </bean>
    <!-- 配置事务的通知 -->
    <tx:advice id="txAdvice" transaction-manager="transactionManager">
        <tx:attributes>
            <tx:method name="*" propagation="REQUIRED" read-only="false"/>
            <tx:method name="find*" propagation="SUPPORTS" read-only="true"/>
        </tx:attributes>
    </tx:advice>
    <!-- 配置 aop -->
    <aop:config>
        <!-- 配置切入点表达式 -->
        <aop:pointcut id="pt1" expression="execution(* com.wsl.service.impl.*.*(..))"/>
        <!-- 建立通知和切入点表达式的关系 -->
        <aop:advisor advice-ref="txAdvice" pointcut-ref="pt1"/>
    </aop:config>
</beans>
创建springmvc.xml文件:
<?xml version="1.0" encoding="UTF-8"?>
<beans xmlns="http://www.springframework.org/schema/beans"
       xmlns:xsi="http://www.w3.org/2001/XMLSchema-instance"
       xmlns:context="http://www.springframework.org/schema/context"
       xmlns:mvc="http://www.springframework.org/schema/mvc"
       xsi:schemaLocation="http://www.springframework.org/schema/beans
        http://www.springframework.org/schema/beans/spring-beans.xsd
        http://www.springframework.org/schema/context
        http://www.springframework.org/schema/context/spring-context.xsd
        http://www.springframework.org/schema/mvc
        http://www.springframework.org/schema/mvc/spring-mvc.xsd">
    <!--开启注解扫描-->
    <context:component-scan base-package="com.wsl">
        <!--只扫描SpringMVC注解-->
        <context:include-filter type="annotation" expression="org.springframework.stereotype.Controller"/>
    </context:component-scan>
    <!--配置视图解析器-->
    <bean id="internalResourceViewResolver" class="org.springframework.web.servlet.view.InternalResourceViewResolver">
        <property name="prefix" value="/WEB-INF/jsp/"></property>
        <property name="suffix" value=".jsp"></property>
    </bean>
    <!--过滤静态资源-->
    <mvc:resources mapping="/js/**" location="/js/"/>
    <mvc:resources mapping="/images/**" location="/images/"/>
    <mvc:resources mapping="/css/**" location="/css/"/>
    <!--开启SpringMVC的注解支持-->
    <mvc:annotation-driven></mvc:annotation-driven>
</beans>
创建mybatis-config.xml文件:
<?xml version="1.0" encoding="UTF-8"?>
<!DOCTYPE configuration
        PUBLIC "-//mybatis.org//DTD Config 3.0//EN"
        "http://mybatis.org/dtd/mybatis-3-config.dtd">
<configuration>
   <!-- <properties resource="jdbcConfig.properties"></properties>-->
    <!-- 类型别名 -->
    <typeAliases>
        <package name="com.wsl.pojo"/>
    </typeAliases>
   <!-- <environments default="mysql">
        <environment id="mysql">
            <transactionManager type="JDBC"></transactionManager>
            <dataSource type="pooled">
                <property name="driver" value="${jdbc.driver}"/>
                <property name="url" value="${jdbc.url}"/>
                <property name="username" value="${jdbc.username}"/>
                <property name="password" value="${jdbc.password}"/>
            </dataSource>
        </environment>
    </environments>-->

    <!--mapper映射位置-->
    <!--<mappers>
        <package name="com.wsl.mapper"/>
    </mappers>-->
</configuration>
创建log4j.properties文件:
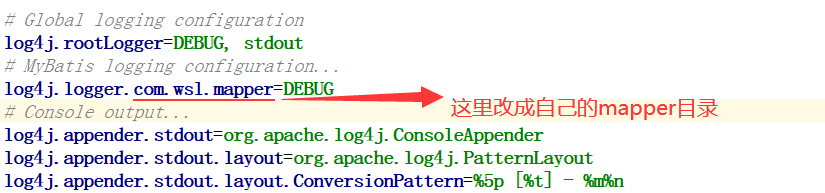
# Global logging configuration
log4j.rootLogger=DEBUG, stdout
# MyBatis logging configuration...
log4j.logger.com.wsl.mapper=DEBUG
# Console output...
log4j.appender.stdout=org.apache.log4j.ConsoleAppender
log4j.appender.stdout.layout=org.apache.log4j.PatternLayout
log4j.appender.stdout.layout.ConversionPattern=%5p [%t] - %m%n
在web.xml文件中配置:
<web-app xmlns="http://xmlns.jcp.org/xml/ns/javaee"
         xmlns:xsi="http://www.w3.org/2001/XMLSchema-instance"
         xsi:schemaLocation="http://xmlns.jcp.org/xml/ns/javaee http://xmlns.jcp.org/xml/ns/javaee/web-app_3_1.xsd"
         version="3.1">
  <!--配置Servlet前端控制器-->
  <servlet>
    <servlet-name>dispatcherServlet</servlet-name>
    <servlet-class>org.springframework.web.servlet.DispatcherServlet</servlet-class>
    <!--加载springmvc.xml配置文件-->
    <init-param>
      <param-name>contextConfigLocation</param-name>
      <param-value>classpath:springmvc.xml</param-value>
    </init-param>
    <!--启动服务器,创建Servlet-->
    <load-on-startup>1</load-on-startup>
  </servlet>
  <servlet-mapping>
    <servlet-name>dispatcherServlet</servlet-name>
    <url-pattern>/</url-pattern>
  </servlet-mapping>


  <!--配置中文乱码过滤器-->
  <filter>
    <filter-name>characterEncodingFilter</filter-name>
    <filter-class>org.springframework.web.filter.CharacterEncodingFilter</filter-class>
    <!--编码值-->
    <init-param>
      <param-name>encoding</param-name>
      <param-value>UTF-8</param-value>
    </init-param>
    <init-param>
      <param-name>forceEncoding</param-name>
      <param-value>true</param-value>
    </init-param>
  </filter>
  <filter-mapping>
    <filter-name>characterEncodingFilter</filter-name>
    <!--拦截所有-->
    <url-pattern>/*</url-pattern>
  </filter-mapping>


  <!-- 配置Spring的监听器,用于启动服务时加载容器 -->
  <listener>
    <listener-class>org.springframework.web.context.ContextLoaderListener</listener-class>
  </listener>
  <!-- 手动指定 spring 配置文件位置 -->
  <context-param>
    <param-name>contextConfigLocation</param-name>
    <param-value>classpath:applicationContext.xml</param-value>
  </context-param>

</web-app>
实体类Account:
@Data
@AllArgsConstructor
@NoArgsConstructor
public class Account implements Serializable {
    private int id;
    private String name;
    private double money;
}
Mapper接口AccountMapper:
public interface AccountMapper {

    /**
     * @return accounts
     * 查询account集合
     */
    List<Account> selectAll();

    /**
     * @return account
     * 查询单个数据
     */
    Account selectOne();

    /**
     * @param account
     * 添加数据
     */
    void add(Account account);

    /**
     * @param account
     * 修改
     */
    void update(Account account);

    /**
     * @param id
     * 删除
     */
    void delete(int id);
}
AccountMapper.xml文件(这里文件位置必须在mapper接口同一包下):
<?xml version="1.0" encoding="UTF-8"?>
<!DOCTYPE mapper
        PUBLIC "-//mybatis.org//DTD Mapper 3.0//EN"
        "http://mybatis.org/dtd/mybatis-3-mapper.dtd">
<mapper namespace="com.wsl.mapper.AccountMapper">
    <select id="selectAll" resultType="account">
        select *  from ssm.account
    </select>
    <select id="selectOne" resultType="account" parameterType="Integer">
        select * from ssm.account where id = #{id}
    </select>
    <insert id="add" parameterType="account">
        insert into ssm.account(name, money) values (#{name},#{money})
    </insert>
    <update id="update" parameterType="account">
        update ssm.account set name = #{name},money = #{money} where id = #{id}
    </update>
    <delete id="delete" parameterType="Integer">
        delete from ssm.account where id = #{id}
    </delete>
</mapper>
AccountService接口:
public interface AccountService {

    /**
     * @return Account
     * 查询所有account数据
     */
    public List<Account> findAll();

    /**
     * @param id
     * @return Account
     * 根据id查询Account单个数据
     */
    public Account findAccById(int id);

    /**
     * 添加
     */
    public void add(Account account);

    /**
     * @param account
     * 修改
     */
    public void update(Account account);

    /**
     * @param id
     * 删除
     */
    public void delete(int id);

}
AccountServiceImpl实现类:
@Service("accountService")
public class AccountServiceImpl implements AccountService {
    @Autowired
    private AccountMapper accountMapper;
    /**
     * @return Account
     * 查询所有account数据
     */
    @Override
    public List<Account> findAll() {
        System.out.println("业务成调用查询所有方法");
        List<Account> accounts = accountMapper.selectAll();
        return accounts;
    }

    /**
     * @param id
     * @return Account
     * 根据id查询Account单个数据
     */
    @Override
    public Account findAccById(int id) {
        Account account = accountMapper.selectOne();
        return account;
    }

    /**
     * 添加
     *
     * @param account
     */
    @Override
    public void add(Account account) {
        accountMapper.add(account);
    }

    /**
     * @param account 修改
     */
    @Override
    public void update(Account account) {
        accountMapper.update(account);

    }

    /**
     * @param id 删除
     */
    @Override
    public void delete(int id) {
        accountMapper.delete(id);
    }
}
AccountController控制类:
@Controller
@RequestMapping("account")
public class AccountController {
    @Autowired
    private AccountService accountService;

    @RequestMapping("findAll")
    public String findAll(Model model){
        List<Account> accounts = accountService.findAll();
        model.addAttribute("accounts",accounts);
        return "list";
    }
    @RequestMapping("saveAccount")
    public String findAll(Account account){
        accountService.add(account);
        return "redirect:findAll";
    }
index.jsp页面:
<%@ page contentType="text/html;charset=UTF-8" language="java" %>
<html>
<head>
    <title>Title</title>
</head>
<body>
<h1><a href="account/findAll">测试</a></h1>
<hr/>
<form action="account/saveAccount" method="post">
    账户名称:<input type="text" name="name"/><br/>
    账户金额:<input type="text" name="money"><br/>
    <input type="submit" value=" 保存 "/></form>
</body>
</html>
list.jsp页面:
<%@ page contentType="text/html;charset=UTF-8" language="java" isELIgnored="false" %>
<%@taglib prefix="c" uri="http://java.sun.com/jsp/jstl/core" %>
<html>
<head>
    <title>Title</title>
</head>
<body>
<h1>跳转成功</h1>
<table border="1" width="300px">
    <tr>
        <th>编号</th>
        <th>账户名称</th>
        <th>账户金额</th>
    </tr>
    <c:forEach items="${accounts}" var="account" varStatus="vs">
        <tr>
            <td>${vs.count}</td>
            <td>${account.name }</td>
            <td>${account.money }</td>
        </tr>
    </c:forEach>
</table>
</body>
</html>
运行项目进行测试:
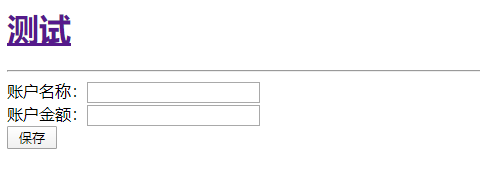
测试结果:

以上就是SSM框架的简单整合和使用。
注:这只是我作为个人搭建SSM框架笔记,并不详细只是作为快速搭建,如果问题可以指出勿喷,毕竟我也只是一个小菜鸟。
相关文章
- 暂无相关文章
用户点评