(一)Spring源码——IoC骗,
(一)Spring源码——IoC骗,
@[toc]
1. Spring注解的源码分析
1.1 我如何开始分析源码的?
这一部分可以略过直接看第1.2节
想必程序员都会经过这样一个阶段,当一门编程语言的语法已经能够熟练运用。并且它的流行框架也能够用到五分熟,程序员就会找进阶的入口,这时候就想到了去了解源码。
作为Java程序员,首先想到的一定是了解Spring源码,但是Spring这个东西庞然大物,从哪里开始都是个问题!这时候我就想起了唐曾那句话:“贫僧从东土大唐而来,往西天取经而去”。真的很羡慕他,知道自己从哪来,还知道自己该往哪去。这样的人已经不多了。那么对Spring源码的剖析该从哪来呢?
我经历过这几个阶段:
graph LR G(看视频) --> E(看博文) E --> F(啃书籍)1.2 Spring的模块
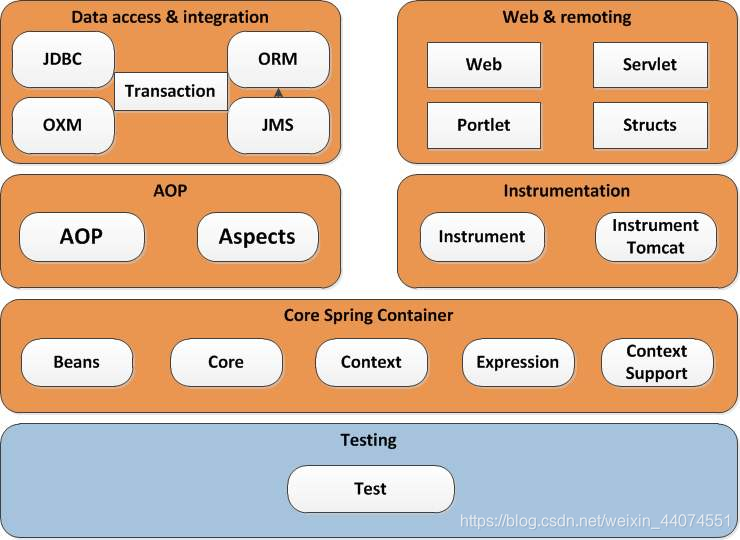
Spirng的模块有很多,这里我不必多说。想要了解spring那最好是从Spring的Ioc容器,DI依赖注入,AOP切面编程,MVC,数据库处理这几个入手。废话不多说,直接上手Spring Ioc容器,请看下节。
1.3 找到一个入口
1.3.1 Spring容器
一说到Spring容器,会想到什么呢?有些人会想到ApplicationContext,BeanFactory,好像没错。但是理解的太狭隘了。我理解的Spring 容器是包含Bean的生命周期,从一个Bean装载到这个Bean被初始化并注册到容器中的过程中所涉及到的容器和类的总体成为Ioc容器。从ApplicationContext这个名字也能看出来,它有上下文的意思。
随着Spring版本的更新,最新的Spring5 配上Springboot 2.x已经全面推荐使用注解开发,AnnotationConfigWebApplicationContext只是AnnotationConfigApplicationContext的Web版本。所以接下来讲到的就以AnnotationConfigApplicationContext这个类为例分析源码。
2. Ioc容器分析
在spring环境下,先准备一个名为AppConfig的类。名字自己起。通过AnnotationConfigApplicationContext容器对它的扫描Bean、解析Bean、注册Bean的过程来分析容器的整个创建过程。
 AppConfig.java文件源码:
package com.abc;

import org.springframework.context.annotation.ComponentScan;
import org.springframework.context.annotation.Configuration;
import org.springframework.context.annotation.Scope;

@Configuration
@ComponentScan("com.abc")
@Scope("singleton")
public class AppConfig {
	public AppConfig() {
		System.out.println("com.abc.AppConfig");
	}
}
TestAppConfig.java文件源码:
public class TestAppConfig {
	@Test
	public void testAnno() {
		// 创建注解上下文容器(Ioc容器)
		AnnotationConfigApplicationContext atx = new AnnotationConfigApplicationContext(AppConfig.class);
		System.out.println(atx);
		// xml加载容器方式,在这里不做介绍。
		// ApplicationContext app = new ClassPathXmlApplicationContext("application.xml");
	}
}
看上面的测试类。想要观察AnnotationConfigApplicationContext容器的创建过程,实际上就是看这个对象怎么被new出来的。通过以下代码,我们查看他的构造函数。
	// 最常用的构造函数
	public AnnotationConfigApplicationContext(Class<?>... componentClasses) {
		// 实例化了一个DefaultListableBeanFactory
		this();
		// AppConfig是没有Component注解的。但它被扫描是必要的。
		// 将AppConfig这个类注册成一个BeanDefinition添加到Map中
		// BeanDefinition是bean容器的一个重要的类,它是bean的定义。你可以先记住,不需要理解
		register(componentClasses);
		// refresh是SpringFramework中最重要的方法,没有之一
		refresh();
	}
其中,
- this()方法是调用默认构造函数。
- register()方法是将bean注册到容器中。
- refresh()方法是刷新容器,因为注册的bean在这里就需要手动刷新一下容器。
接下来,顺着构造方法一起走,来看register的源码:
	// 注册一个注解Bean
	// 新注册的注解Bean必须手动调用refresh方法,来刷新容器对Bean的处理。
	@Override
	public void register(Class<?>... componentClasses) {
		...省略断言语句
		this.reader.register(componentClasses);
	}
在构造方法中的register()方法原来是委派了reader的register方法。这个reader是什么呢?reader是AnnotationConfigApplicationContext的一个属性。从名字看它是注解bean定义读取器(同学们断句一定要注意啊,把注解bean当成一个整体名词,说白了reader就是一个读取器,用来读取注解bean定义的读取器)
public class AnnotationConfigApplicationContext extends GenericApplicationContext implements AnnotationConfigRegistry {
	// 用来读取注解的Bean定义读取器
	// 将该读取器存放到容器中
	private final AnnotatedBeanDefinitionReader reader;

	// Bean定义的扫描器,扫描指定路劲下的注解Bean
	private final ClassPathBeanDefinitionScanner scanner;
	......
}
顺着读取器。来看一下上面提到的this.reader.register(componentClasses);,
	// 注册多个{注解Bean定义}类
	public void register(Class<?>... componentClasses) {
		for (Class<?> componentClass : componentClasses) {
			registerBean(componentClass);
		}
	}
	// 注册一个{注解Bean定义}类
	public void registerBean(Class<?> beanClass) {
		doRegisterBean(beanClass, null, null, null);
	}
从源码中可以看出,在register方法中调用了四个参数的doRegisterBean方法。 doRegisterBean:
	<T> void doRegisterBean(Class<T> beanClass, @Nullable Supplier<T> instanceSupplier, @Nullable String name,
			@Nullable Class<? extends Annotation>[] qualifiers, BeanDefinitionCustomizer... definitionCustomizers) {
		// 注解生成bean定义
		// 根据指定的注解类,创建一个数据结构——封装注解bean定义的数据结构
		AnnotatedGenericBeanDefinition abd = new AnnotatedGenericBeanDefinition(beanClass);
		if (this.conditionEvaluator.shouldSkip(abd.getMetadata())) {
			return;
		}

		// 设置实例提供者
		abd.setInstanceSupplier(instanceSupplier);

		// 1. 解析bean作用域
		// 获取 Scope注解元数据 对象
		// 解析bean的作用域
		// prototype为原型模式,singleton为单例
		ScopeMetadata scopeMetadata = this.scopeMetadataResolver.resolveScopeMetadata(abd);
		// 设置注解bean定义的作用域
		abd.setScope(scopeMetadata.getScopeName());
		// 获取beanName ,如果name没有传值就从beanNameGenerator生成一个
		String beanName = (name != null ? name : this.beanNameGenerator.generateBeanName(abd, this.registry));
		// 2. 处理通用注解
		// 处理注解bean定义中的通用注解(如:@Lazy @Primary等)
		AnnotationConfigUtils.processCommonDefinitionAnnotations(abd);
		if (qualifiers != null) {
			for (Class<? extends Annotation> qualifier : qualifiers) {
				if (Primary.class == qualifier) {
					abd.setPrimary(true);
				}
				else if (Lazy.class == qualifier) {
					abd.setLazyInit(true);
				}
				else {
					abd.addQualifier(new AutowireCandidateQualifier(qualifier));
				}
			}
		}
		for (BeanDefinitionCustomizer customizer : definitionCustomizers) {
			customizer.customize(abd);
		}

		// 创建一个指定bean名称的Bean定义对象。封装  注解bean定义数据
		BeanDefinitionHolder definitionHolder = new BeanDefinitionHolder(abd, beanName);
		// 3. 创建作用域的代理对象
		definitionHolder = AnnotationConfigUtils.applyScopedProxyMode(scopeMetadata, definitionHolder, this.registry);
		// 4. 通过BeanDefinitionReaderUtils向容器注册bean
		BeanDefinitionReaderUtils.registerBeanDefinition(definitionHolder, this.registry);
	}
到此AnnotationConfigApplicationContext这个容器注册Bean的过程就完成了。
看过来看过来!!!!划重点了
过多的源码看起来眼花缭乱,看不懂就对了!没关系,源码的东西别想一遍能看懂,需要反复的看
第一遍了解大概,认识基本的概念比如上下文-ApplicationContext,注解Bean-定义AnnotatedBeanDefinition,Bean定义-BeanDefinition,Bean读取器-AnnotatedBeanDefinitionReader,Bean扫描器。
第二遍巩固概念,理解一下什么叫做Bean定义-BeanDefinition等这些概念。然后你就能一步一步的入门了。
3. IoC总结
还是重!点! 回头再来看IoC容器,现在你可以说实现BeanFactory的都可以叫做IoC容器。(包括中间的Bean定义、存储Bean的数据结构等等)
IoC只是Spring这座大山的一角而已,IoC的功能就是,读取了Bean放在自己的容器中。
我们都知道Bean是一个简单对象,现在把Bean理解成一个汽车轮子,里面的属性都是轮子的组件——轮胎、轮轴、轮盘等等。BeanDefinition就是存储轮子的数据结构的一种描述!
而Bean读取器-AnnotatedBeanDefinitionReader则是读取这种描述的,相当于把造轮子的图纸读了一下,而AnnotatedBeanDefinitionReader是applicationContext的一个属性,也就是说applicationContext读取了造轮子的图纸,那么applicationContext就可以造轮子了。
第二节applicationContext构造方法中的register()方法就是读取轮子图纸的过程。refresh是刷新的作用。
经过下面 三个方法后,IoC容器算是真的可以造轮子(制造Bean)了。注意是可以造,但还没造呢! 但是它并没有执行造轮子的请求。想要造轮子就需要依赖注入DI或者getBean显示调用了。
	// 最常用的构造函数
	public AnnotationConfigApplicationContext(Class<?>... componentClasses) {
		// 实例化了一个DefaultListableBeanFactory
		this();
		register(componentClasses);
		// refresh是SpringFramework中最重要的方法,没有之一
		refresh();
	}
好了到此,IoC的简单分析已经完毕。如有错误,请留言更正,谢谢!!
相关文章
- 暂无相关文章
用户点评