分布式ID生成器,
在高并发或者分表分库情况下怎么保证数据id的幂等性呢?
经常用到的解决方案有以下几种:
1. 微软公司通用唯一识别码(UUID)
2. Twitter公司雪花算法(SnowFlake)
3. 基于数据库的id自增
4. 对id进行缓
本文将对snowflake算法进行讲解:
1. snowflake是Twitter开源的分布式ID生成算法,结果是一个long型的ID。
2. 其核心思想是:使用41bit作为毫秒数,10bit作为机器的ID(5个bit是数据中心,5个bit的机器ID),12bit作为毫秒内的流水号,最后还有一个符号位,永远是0。
snowflake算法所生成的ID结构:
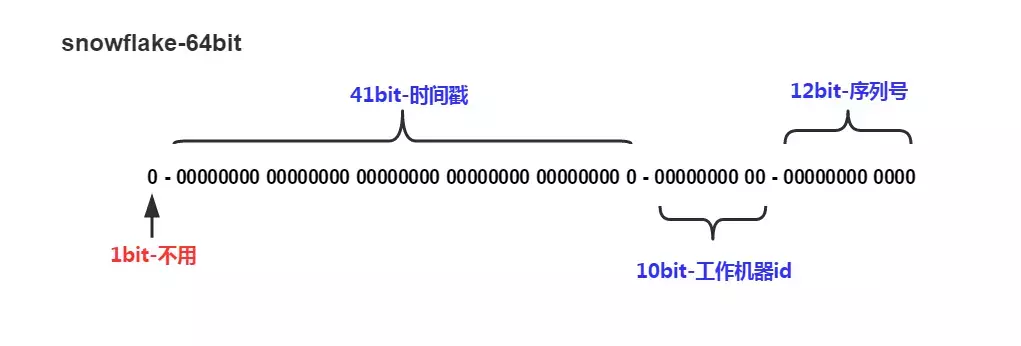
1. 整个结构是64位,所以我们在Java中可以使用long来进行存储。
2. 该算法实现基本就是二进制操作,单机每秒内理论上最多可以生成1024*(2^12),也就是409.6万个ID(1024 X 4096 = 4194304)
64位说明:
1. 0 - 0000000000 0000000000 0000000000 0000000000 0 - 00000 - 00000 - 000000000000
2. 1位标识,由于long基本类型在Java中是带符号的,最高位是符号位,正数是0,负数是1,所以id一般是正数,最高位是0
3. 41位时间截(毫秒级),注意,41位时间截不是存储当前时间的时间截,而是存储时间截的差值(当前时间截 - 开始时间截) 得到的值)。
这里的的开始时间截,一般是我们的id生成器开始使用的时间,由我们程序来指定的(如下下面程序IdWorker类的startTime属性)。
41位的时间截,可以使用69年,年T = (1L << 41) / (1000L * 60 * 60 * 24 * 365) = 69
4. 10位的数据机器位,可以部署在1024个节点,包括5位datacenterId和5位workerId
5. 12位序列,毫秒内的计数,12位的计数顺序号支持每个节点每毫秒(同一机器,同一时间截)产生4096个ID序号加起来刚好64位,为一个Long型。
SnowFlake的优点:
1. 整体上按照时间自增排序,并且整个分布式系统内不会产生ID碰撞(由数据中心ID和机器ID作区分),并且效率较高,经测试,SnowFlake每秒能够产生26万ID左右。
2. 生成ID时不依赖于DB,完全在内存生成,高性能高可用。
3. ID呈趋势递增,后续插入索引树的时候性能较好。
SnowFlake算法的缺点:
依赖于系统时钟的一致性。如果某台机器的系统时钟回拨,有可能造成ID冲突,或者ID乱序
算法代码如下:

![]() 1 /**
2 * 功能描述:SnowFlake算法
3 * @author PanHu Sun
4 * @Date 2019/12/1 18:47
5 */
6 public class SnowflakeIdWorker {
7 // ==============================Fields==================
8 /** 开始时间截 (2019-08-06) */
9 private final long
1 /**
2 * 功能描述:SnowFlake算法
3 * @author PanHu Sun
4 * @Date 2019/12/1 18:47
5 */
6 public class SnowflakeIdWorker {
7 // ==============================Fields==================
8 /** 开始时间截 (2019-08-06) */
9 private final long twepoch = 1565020800000L
;
10
11 /** 机器id所占的位数 */
12 private final long workerIdBits = 5L
;
13
14 /** 数据标识id所占的位数 */
15 private final long datacenterIdBits = 5L
;
16
17 /** 支持的最大机器id,结果是31 (这个移位算法可以很快的计算出几位二进制数所能表示的最大十进制数) */
18 private final long maxWorkerId = -1L ^ (-1L <<
workerIdBits);
19
20 /** 支持的最大数据标识id,结果是31 */
21 private final long maxDatacenterId = -1L ^ (-1L <<
datacenterIdBits);
22
23 /** 序列在id中占的位数 */
24 private final long sequenceBits = 12L
;
25
26 /** 机器ID向左移12位 */
27 private final long workerIdShift =
sequenceBits;
28
29 /** 数据标识id向左移17位(12+5) */
30 private final long datacenterIdShift = sequenceBits +
workerIdBits;
31
32 /** 时间截向左移22位(5+5+12) */
33 private final long timestampLeftShift = sequenceBits + workerIdBits +
datacenterIdBits;
34
35 /** 生成序列的掩码,这里为4095 (0b111111111111=0xfff=4095) */
36 private final long sequenceMask = -1L ^ (-1L <<
sequenceBits);
37
38 /** 工作机器ID(0~31) */
39 private long workerId;
40
41 /** 数据中心ID(0~31) */
42 private long datacenterId;
43
44 /** 毫秒内序列(0~4095) */
45 private long sequence = 0L
;
46
47 /** 上次生成ID的时间截 */
48 private long lastTimestamp = -1L
;
49
50 //==============================Constructors====================
51 /**
52 * 构造函数
53 * @param workerId 工作ID (0~31)
54 * @param datacenterId 数据中心ID (0~31)
55 */
56 public SnowflakeIdWorker(
long workerId,
long datacenterId) {
57 if (workerId > maxWorkerId || workerId < 0
) {
58 throw new IllegalArgumentException(String.format("worker Id can't be greater than %d or less than 0"
, maxWorkerId));
59 }
60 if (datacenterId > maxDatacenterId || datacenterId < 0
) {
61 throw new IllegalArgumentException(String.format("datacenter Id can't be greater than %d or less than 0"
, maxDatacenterId));
62 }
63 this.workerId =
workerId;
64 this.datacenterId =
datacenterId;
65 }
66
67 // ==============================Methods=================================
68 /**
69 * 获得下一个ID (该方法是线程安全的)
70 * @return SnowflakeId
71 */
72 public synchronized long nextId() {
73 long timestamp =
timeGen();
74
75 //如果当前时间小于上一次ID生成的时间戳,说明系统时钟回退过这个时候应当抛出异常
76 if (timestamp <
lastTimestamp) {
77 throw new RuntimeException(
78 String.format("Clock moved backwards. Refusing to generate id for %d milliseconds", lastTimestamp -
timestamp));
79 }
80
81 //如果是同一时间生成的,则进行毫秒内序列
82 if (lastTimestamp ==
timestamp) {
83 sequence = (sequence + 1) &
sequenceMask;
84 //毫秒内序列溢出
85 if (sequence == 0
) {
86 //阻塞到下一个毫秒,获得新的时间戳
87 timestamp =
tilNextMillis(lastTimestamp);
88 }
89 }
90 //时间戳改变,毫秒内序列重置
91 else {
92 sequence = 0L
;
93 }
94
95 //上次生成ID的时间截
96 lastTimestamp =
timestamp;
97
98 //移位并通过或运算拼到一起组成64位的ID
99 return ((timestamp - twepoch) << timestampLeftShift)
//
100 | (datacenterId << datacenterIdShift)
//
101 | (workerId << workerIdShift)
//
102 |
sequence;
103 }
104
105 /**
106 * 阻塞到下一个毫秒,直到获得新的时间戳
107 * @param lastTimestamp 上次生成ID的时间截
108 * @return 当前时间戳
109 */
110 protected long tilNextMillis(
long lastTimestamp) {
111 long timestamp =
timeGen();
112 while (timestamp <=
lastTimestamp) {
113 timestamp =
timeGen();
114 }
115 return timestamp;
116 }
117
118 /**
119 * 返回以毫秒为单位的当前时间
120 * @return 当前时间(毫秒)
121 */
122 protected long timeGen() {
123 return System.currentTimeMillis();
124 }
125
126 //==============================Test=============================================
127 /** 测试 */
128 public static void main(String[] args) {
129 SnowflakeIdWorker idWorker =
new SnowflakeIdWorker(0, 0
);
130 for (
int i = 0; i < 1000; i++
) {
131 long id =
idWorker.nextId();
132 System.out.println(Long.toBinaryString(id));
133 System.out.println(id);
134 }
135 }
136 }
View Code
快速使用snowflake算法只需以下几步:
1. 引入hutool依赖
![]() 1 <dependency>
2 <groupId>
1 <dependency>
2 <groupId>cn.hutool
</groupId>
3 <artifactId>hutool-captcha
</artifactId>
4 <version>5.0.6
</version>
5 </dependency>
View Code
2. ID 生成器
![]() 1 import cn.hutool.core.date.DatePattern;
2 import cn.hutool.core.lang.ObjectId;
3 import cn.hutool.core.lang.Snowflake;
4 import cn.hutool.core.net.NetUtil;
5 import cn.hutool.core.util.IdUtil;
6 import cn.hutool.core.util.RandomUtil;
7 import lombok.extern.slf4j.Slf4j;
8 import org.joda.time.DateTime;
9
10 import javax.annotation.PostConstruct;
11 import java.util.concurrent.ExecutorService;
12 import java.util.concurrent.Executors;
13
14 /**
15 * 功能描述:
16 * @author PanHu Sun
17 * @Date 2019/12/1 18:50
18 */
19 @Slf4j
20 public class IdGenerator {
21
22 private long
1 import cn.hutool.core.date.DatePattern;
2 import cn.hutool.core.lang.ObjectId;
3 import cn.hutool.core.lang.Snowflake;
4 import cn.hutool.core.net.NetUtil;
5 import cn.hutool.core.util.IdUtil;
6 import cn.hutool.core.util.RandomUtil;
7 import lombok.extern.slf4j.Slf4j;
8 import org.joda.time.DateTime;
9
10 import javax.annotation.PostConstruct;
11 import java.util.concurrent.ExecutorService;
12 import java.util.concurrent.Executors;
13
14 /**
15 * 功能描述:
16 * @author PanHu Sun
17 * @Date 2019/12/1 18:50
18 */
19 @Slf4j
20 public class IdGenerator {
21
22 private long workerId = 0
;
23
24 @PostConstruct
25 void init() {
26 try {
27 workerId =
NetUtil.ipv4ToLong(NetUtil.getLocalhostStr());
28 log.info("当前机器 workerId: {}"
, workerId);
29 }
catch (Exception e) {
30 log.warn("获取机器 ID 失败"
, e);
31 workerId =
NetUtil.getLocalhost().hashCode();
32 log.info("当前机器 workerId: {}"
, workerId);
33 }
34 }
35
36 /**
37 * 获取一个批次号,形如 2019071015301361000101237
38 * 数据库使用 char(25) 存储
39 * @param tenantId 租户ID,5 位
40 * @param module 业务模块ID,2 位
41 * @return 返回批次号
42 */
43 public static synchronized String batchId(
int tenantId,
int module) {
44 String prefix =
DateTime.now().toString(DatePattern.PURE_DATETIME_MS_PATTERN);
45 return prefix + tenantId + module + RandomUtil.randomNumbers(3
);
46 }
47
48 @Deprecated
49 public synchronized String getBatchId(
int tenantId,
int module) {
50 return batchId(tenantId, module);
51 }
52
53 /**
54 * 生成的是不带-的字符串,类似于:b17f24ff026d40949c85a24f4f375d42
55 * @return
56 */
57 public static String simpleUUID() {
58 return IdUtil.simpleUUID();
59 }
60
61 /**
62 * 生成的UUID是带-的字符串,类似于:a5c8a5e8-df2b-4706-bea4-08d0939410e3
63 * @return
64 */
65 public static String randomUUID() {
66 return IdUtil.randomUUID();
67 }
68
69 private Snowflake snowflake = IdUtil.createSnowflake(workerId, 1
);
70
71 public synchronized long snowflakeId() {
72 return snowflake.nextId();
73 }
74
75 public synchronized long snowflakeId(
long workerId,
long dataCenterId) {
76 Snowflake snowflake =
IdUtil.createSnowflake(workerId, dataCenterId);
77 return snowflake.nextId();
78 }
79
80 /**
81 * 生成类似:5b9e306a4df4f8c54a39fb0c
82 * ObjectId 是 MongoDB 数据库的一种唯一 ID 生成策略,
83 * 是 UUID version1 的变种,详细介绍可见:服务化框架-分布式 Unique ID 的生成方法一览。
84 * @return
85 */
86 public static String objectId() {
87 return ObjectId.next();
88 }
89
90
91
92
93 // 测试
94 public static void main(String[] args) {
95 // 还会有重复的
96 // for (int i = 0; i < 100; i++) {
97 // String batchId = batchId(1001, 100);
98 // log.info("批次号: {}", batchId);
99 // }
100
101 // UUID 不带 -
102 // for (int i = 0; i < 100; i++) {
103 // String simpleUUID = simpleUUID();
104 // log.info("simpleUUID: {}", simpleUUID);
105 // }
106
107 // UUID 带 -
108 // for (int i = 0; i < 100; i++) {
109 // String randomUUID = randomUUID();
110 // log.info("randomUUID: {}", randomUUID);
111 // }
112
113 // 没有重复
114 // for (int i = 0; i < 100; i++) {
115 // String objectId = objectId();
116 // log.info("objectId: {}", objectId);
117 // }
118
119 ExecutorService executorService = Executors.newFixedThreadPool(20
);
120 IdGenerator idGenerator =
new IdGenerator();
121 for (
int i = 0; i < 100; i++
) {
122 executorService.execute(() ->
{
123 log.info("分布式 ID: {}"
, idGenerator.snowflakeId());
124 });
125 }
126 executorService.shutdown();
127 }
128 }
View Code
3. 测试类
![]() 1 public class IdGeneratorTest {
2 @Autowired
3 private IdGenerator idGenerator;
4
5 @Test
6 public void testBatchId() {
7 for
1 public class IdGeneratorTest {
2 @Autowired
3 private IdGenerator idGenerator;
4
5 @Test
6 public void testBatchId() {
7 for (
int i = 0; i < 100; i++
) {
8 String batchId = idGenerator.batchId(1001, 100
);
9 log.info("批次号: {}"
, batchId);
10 }
11 }
12
13 @Test
14 public void testSimpleUUID() {
15 for (
int i = 0; i < 100; i++
) {
16 String simpleUUID =
idGenerator.simpleUUID();
17 log.info("simpleUUID: {}"
, simpleUUID);
18 }
19 }
20
21 @Test
22 public void testRandomUUID() {
23 for (
int i = 0; i < 100; i++
) {
24 String randomUUID =
idGenerator.randomUUID();
25 log.info("randomUUID: {}"
, randomUUID);
26 }
27 }
28
29 @Test
30 public void testObjectID() {
31 for (
int i = 0; i < 100; i++
) {
32 String objectId =
idGenerator.objectId();
33 log.info("objectId: {}"
, objectId);
34 }
35 }
36
37 @Test
38 public void testSnowflakeId() {
39 ExecutorService executorService = Executors.newFixedThreadPool(20
);
40 for (
int i = 0; i < 20; i++
) {
41 executorService.execute(() ->
{
42 log.info("分布式 ID: {}"
, idGenerator.snowflakeId());
43 });
44 }
45 executorService.shutdown();
46 }
47 }
View Code
运行结果:
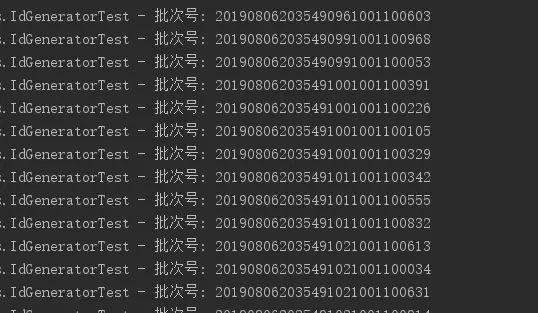
注:在项目中我们只需要注入 @Autowired private IdGenerator idGenerator;即可,然后设置id order.setId(idGenerator.snowflakeId() + "");
转载链接:https://juejin.im/post/5d8882d8f265da03e369c063
用户点评