SpringBoot中使用Zuul,
Zuul提供了服务网关的功能,可以实现负载均衡、反向代理、动态路由、请求转发等功能。
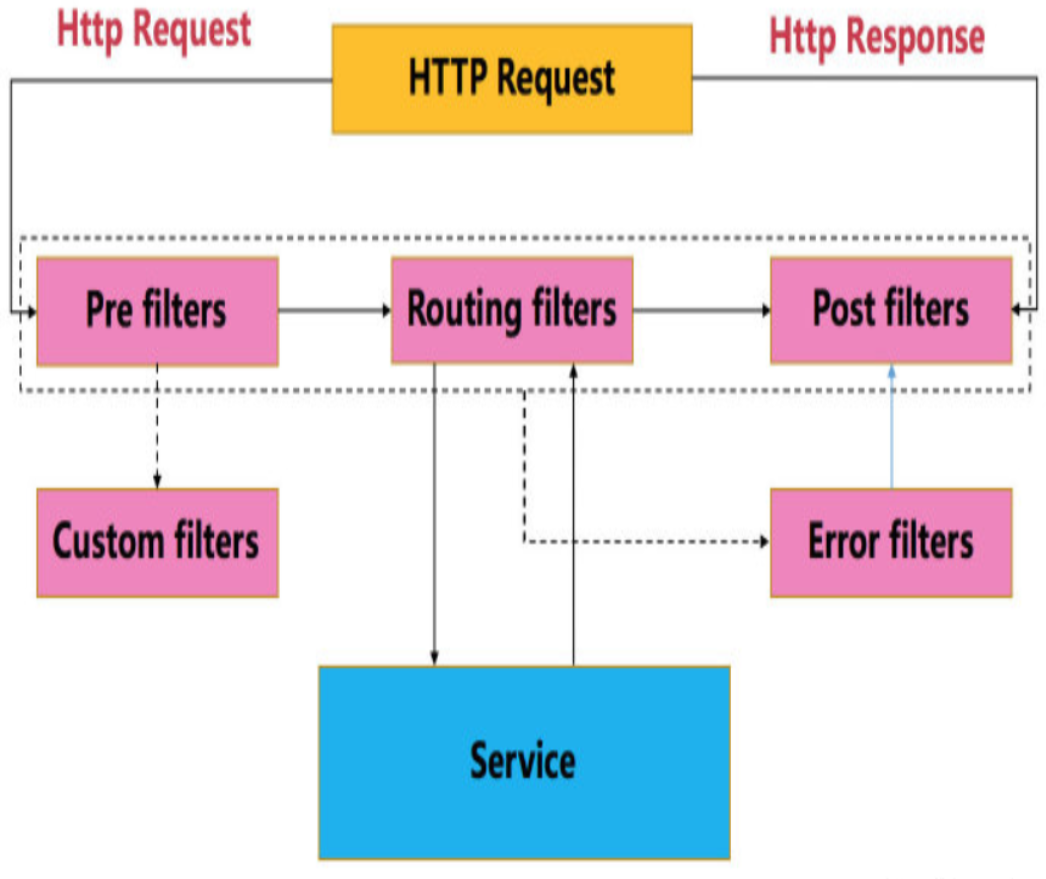
Zuul大部分功能是通过过滤器实现的,除了标准的四种过滤器类型,还支持自定义过滤器。
使用@EnableZuulProxy注解,Spring容器初始化时,会将Zuul的相关配置初始化,其中包含一个Spring Boot的Bean:ServletRegistrationBean,该类主要用于注册Servlet。在Servlet的service方法中,执行各种Zuul过滤器。下图为HTTP请求在ZuulServlet中的生命周期。
Spring Boot Web项目中整合Zuul:
一、创建hello源服务项目
1、创建项目
开发工具:IntelliJ IDEA 2019.2.3
IDEA中创建一个新的SpringBoot项目,名称为“hello-server”,SpringBoot版本选择2.1.10,在选择Dependencies(依赖)的界面勾选Web -> Spring Web。
2、修改启动类代码
添加一个hello服务
package com.example.helloserver;

import org.springframework.boot.SpringApplication;
import org.springframework.boot.autoconfigure.SpringBootApplication;
import org.springframework.web.bind.annotation.GetMapping;
import org.springframework.web.bind.annotation.PathVariable;
import org.springframework.web.bind.annotation.RestController;

@SpringBootApplication
@RestController
public class HelloServerApplication {

    public static void main(String[] args) {
        SpringApplication.run(HelloServerApplication.class, args);
    }

    @GetMapping("/hello/{name}")
    public String hello(@PathVariable String name){
        return "hello " + name;
    }
}
3、修改配置application.yml,指定端口号8090
server:
  port: 8090
二、测试路由功能
1、创建项目
IDEA中创建一个新的SpringBoot项目,名称为“zuul-router”,SpringBoot版本选择2.1.10,在选择Dependencies(依赖)的界面勾选Web -> Spring Web,Spring Cloud Routing -> Zuul。
主要添加了spring-boot-starter-web和spring-cloud-starter-netflix-zuul两个依赖项。
pom.xml完整内容如下:

![]() <?xml version="1.0" encoding="UTF-8"?>
<project xmlns="http://maven.apache.org/POM/4.0.0" xmlns:xsi="http://www.w3.org/2001/XMLSchema-instance"
xsi:schemaLocation="http://maven.apache.org/POM/4.0.0 https://maven.apache.org/xsd/maven-4.0.0.xsd">
<modelVersion>
<?xml version="1.0" encoding="UTF-8"?>
<project xmlns="http://maven.apache.org/POM/4.0.0" xmlns:xsi="http://www.w3.org/2001/XMLSchema-instance"
xsi:schemaLocation="http://maven.apache.org/POM/4.0.0 https://maven.apache.org/xsd/maven-4.0.0.xsd">
<modelVersion>4.0.0
</modelVersion>
<parent>
<groupId>org.springframework.boot
</groupId>
<artifactId>spring-boot-starter-parent
</artifactId>
<version>2.1.10.RELEASE
</version>
<relativePath/> <!-- lookup parent from repository -->
</parent>
<groupId>com.example
</groupId>
<artifactId>zuul-router
</artifactId>
<version>0.0.1-SNAPSHOT
</version>
<name>zuul-router
</name>
<description>Demo project for Spring Boot
</description>
<properties>
<java.version>1.8
</java.version>
<spring-cloud.version>Greenwich.SR4
</spring-cloud.version>
</properties>
<dependencies>
<dependency>
<groupId>org.springframework.boot
</groupId>
<artifactId>spring-boot-starter-web
</artifactId>
</dependency>
<dependency>
<groupId>org.springframework.cloud
</groupId>
<artifactId>spring-cloud-starter-netflix-zuul
</artifactId>
</dependency>
<dependency>
<groupId>org.springframework.boot
</groupId>
<artifactId>spring-boot-starter-test
</artifactId>
<scope>test
</scope>
</dependency>
</dependencies>
<dependencyManagement>
<dependencies>
<dependency>
<groupId>org.springframework.cloud
</groupId>
<artifactId>spring-cloud-dependencies
</artifactId>
<version>${spring-cloud.version}
</version>
<type>pom
</type>
<scope>import
</scope>
</dependency>
</dependencies>
</dependencyManagement>
<build>
<plugins>
<plugin>
<groupId>org.springframework.boot
</groupId>
<artifactId>spring-boot-maven-plugin
</artifactId>
</plugin>
</plugins>
</build>
</project>
View Code
2、修改启动类代码
增加注解@EnableZuulProxy
![]() package com.example.zuulrouter;
import org.springframework.boot.SpringApplication;
import org.springframework.boot.autoconfigure.SpringBootApplication;
import org.springframework.cloud.netflix.zuul.EnableZuulProxy;
@SpringBootApplication
@EnableZuulProxy
public class ZuulRouterApplication {
public static void main(String[] args) {
SpringApplication.run(ZuulRouterApplication.class, args);
}
}
View Code
package com.example.zuulrouter;
import org.springframework.boot.SpringApplication;
import org.springframework.boot.autoconfigure.SpringBootApplication;
import org.springframework.cloud.netflix.zuul.EnableZuulProxy;
@SpringBootApplication
@EnableZuulProxy
public class ZuulRouterApplication {
public static void main(String[] args) {
SpringApplication.run(ZuulRouterApplication.class, args);
}
}
View Code
3、修改配置application.yml
zuul:
  routes:
    test:
      url: http://localhost:8090
加入以上配置后,发送给http://localhost:8080/test的所有请求会被转发到8090端口。
在浏览器访问http://localhost:8080/test/hello/lc,页面输出:hello lc
上面路由配置省略了path,默认情况下用routeId“test”作为path。
修改为:
zuul:
  routes:
    test:
      path: /a/**
      url: http://localhost:8090
    b:
      url: https://www.cnblogs.com/gdjlc
现在浏览器访问http://localhost:8080/a/hello/lc,页面输出:hello lc
访问http://localhost:8080/b,页面显示https://www.cnblogs.com/gdjlc的内容
用户点评