SpringBoot起飞系列-Web开发(五),如果飞机还有五分钟起飞
SpringBoot起飞系列-Web开发(五),如果飞机还有五分钟起飞
一、前言
从今天你开始我们就开始进行我们的web开发,之前的一篇用SpringBoot起飞系列-使用idea搭建环境(二)已经说明了我们如何进行开发,当然这是搭建起步,接下来我们就开始进行详细的开发,包括springboot中各种starters的使用,真正的使用到的功能都是我们实际项目中能用到的。
这里要提到的时,springboot的开发是分模块化的,每个模块可以对应一个starter,例如:web开发模块就对应spring-boot-starter-web,除此之外还有访问数据库的模块、Redis模块等等,我们需要什么样的功能就去引入什么模块,这样我们的项目管理起来也是十分方便,项目的条理也更加的清晰。
首先我们要搭建一个web项目,所以我们要先选中web模块,这是必须的,之后的模块需要什么我们再逐一引入。
二、SpringBoot的Web开发约定
2.1 配置约定
俗话说,springboot这个框架本身就是用约定大于配置的方式设计的,很多配置都成了我们的约定(默认的配置),我们虽然可以更改,但是还是有必要知道的。下面我们简单介绍一下springboot的自动配置原理,这就是springboot中的约定的实现方法。
首先,springboot会把配置文件中以某个前缀开头的配置映射的bean中去,这样我们的配置就在程序启动的时候成了一个一个bean,使用起来也比较方便,默认情况下springboot会用一个Configuration和一个Properites类来配置,如下:
xxxxAutoConfiguration:帮我们给容器中自动配置组件;
xxxxProperties:配置类来封装配置文件的内容;
每一个的AutoConfiguration对应一个Properties,springboot中所有的配置都是这么实现的。xxxAutoConfiguration类都是容器中的一个组件,都加入到容器中;用他们来做自动配置;xxxProperties是接受配置的bean。
我们以
@Configuration   //表示这是一个配置类,以前编写的配置文件一样,也可以给容器中添加组件
@EnableConfigurationProperties(HttpEncodingProperties.class)  //启动指定类的ConfigurationProperties功能;将配置文件中对应的值和HttpEncodingProperties绑定起来;并把HttpEncodingProperties加入到ioc容器中

@ConditionalOnWebApplication //Spring底层@Conditional注解(Spring注解版),根据不同的条件,如果满足指定的条件,整个配置类里面的配置就会生效;    判断当前应用是否是web应用,如果是,当前配置类生效

@ConditionalOnClass(CharacterEncodingFilter.class)  //判断当前项目有没有这个类CharacterEncodingFilter;SpringMVC中进行乱码解决的过滤器;

@ConditionalOnProperty(prefix = "spring.http.encoding", value = "enabled", matchIfMissing = true)  //判断配置文件中是否存在某个配置  spring.http.encoding.enabled;如果不存在,判断也是成立的
//即使我们配置文件中不配置pring.http.encoding.enabled=true,也是默认生效的;
public class HttpEncodingAutoConfiguration {

      //他已经和SpringBoot的配置文件映射了
      private final HttpEncodingProperties properties;

   //只有一个有参构造器的情况下,参数的值就会从容器中拿
      public HttpEncodingAutoConfiguration(HttpEncodingProperties properties) {
        this.properties = properties;
    }

    @Bean   //给容器中添加一个组件,这个组件的某些值需要从properties中获取
    @ConditionalOnMissingBean(CharacterEncodingFilter.class) //判断容器没有这个组件?
    public CharacterEncodingFilter characterEncodingFilter() {
        CharacterEncodingFilter filter = new OrderedCharacterEncodingFilter();
        filter.setEncoding(this.properties.getCharset().name());
        filter.setForceRequestEncoding(this.properties.shouldForce(Type.REQUEST));
        filter.setForceResponseEncoding(this.properties.shouldForce(Type.RESPONSE));
        return filter;
    }
所以说springboot有很多这样的类,我们默认只关注配置的prefix就行了, 这是我们以后要覆盖修改springboot的默认配置所需要的配置key。
2.2 静态资源映射约定
首先我们可以先看一下静态资源的配置类,和我们上边说的是一样的,前缀使用的是spring.resources:
@ConfigurationProperties(prefix = "spring.resources", ignoreUnknownFields = false)
public class ResourceProperties implements ResourceLoaderAware {
  //可以设置和静态资源有关的参数,缓存时间等
}
具体代码就不再贴了,直接说结果吧,如果我们用maven管理下载我们的静态资源包时,比如jquery.js什么的,那么我们的默认访问路径是 /webjars/** ,都去 classpath:/META-INF/resources/webjars/ 找资源。
webjars:http://www.webjars.org/,是以jar包的方式引入静态资源。例如我们引入jquery.js库,那么可以再pom.xml中这么写:
<!--引入jquery-webjar-->在访问的时候只需要写webjars下面资源的名称即可
<dependency>
    <groupId>org.webjars</groupId>
    <artifactId>jquery</artifactId>
    <version>3.3.1</version>
</dependency>
然后在resources文件夹下添加templates文件夹,下边添加一个index.html,因为默认配置thymeleaf用的前缀是classpath:/templates,后缀是.html。 然后修改index.html模板,写上thymeleaf语法: 其中xmlns:th="http://www.thymeleaf.org",是导入名称空间,可以让我们编码的时候有thymeleaf语法提示,不得不说这语法和vue是一样的啊。 我们直接访问http://localhost:8080/home/index就可以看到效果了。 上边代码的意思是放我们访问/或者/index.html的时候,默认转发到/home/index路径,我们直接设置home/index的页面就行了。 html代码: 选择变量表达式,也叫星号变量表达式,使用th:object属性来绑定对象。 html代码: 选择变量表达式使用th:object来表示要选择的对象,然后使用*来代表这个对象,后边的{}里边写对象中的属性。 也可以直接使用*{person.name}来获取数据,不同的是${}是在上细纹的map中获取数据,而*是在选择的对象上获取数据。 生成一个url地址或者一个路径。可用于<script src="..">、<link href="..">、<a href="..">等。 几乎所有的html属性都能用th:xxx的形式替换,经过thymeleaf解析后会直接替换为原始html属性和值。 thymeleaf提供了一些内置对象,可以让我们直接使用,访问一些请求信息。 #request: ${#request.getContextPath()} ${#request.getAttribute("name")} #session: {#session.getAttribute("loginUser")} {#session.id} 工具对象可以帮助我们格式化一样数据,简单的处理一数据。 1. 模板片段:可以让我们引入一个写好的html片段,相当于jsp:include功能了,比如头部和尾部我们都一样就可以复用,也可以引入一个页面当做layout布局页,以后的页面都使用这个模板。 我们可以使用th:fragment来定义一个模板,使用th:insert、th:replace、th:include来替换模板。 其中: 这三个命令的语法格式为templatename::[domselector]。 我们先添加模板fragment/footer.html: home/index.html引用模板: 三个命令生成html结构如下,稍微有些不一样: 添加一个layout页面(父页面): 添加一个子页面,以这个_home.html为父页面: 其中:layout:decorator="_layout/_home" 指明布局页的路径,layout:fragment="content",指明要替换布局页中的位置。 html代码: 输出: 这次介绍了web开发的基本流程、包括静态文件、模板引擎等,我们现在已经做好了web开发的准备工作,接下来就可以进行业务功能的编写了,接下来我们会做一个简单的CRUD来具体了解一下Web的基本流程。"classpath:/META-INF/resources/",
"classpath:/resources/",
"classpath:/static/",
"classpath:/public/"
"/":当前项目的根路径
<dependency>
<groupId>org.springframework.boot</groupId>
<artifactId>spring-boot-starter-thymeleaf</artifactId>
</dependency>
@Controller
@RequestMapping("/home")
public class HomeController {
@RequestMapping("/index")
public String index(ModelMap map) {
map.put("hello","你好");
return "index";
}
}
<!DOCTYPE html>
<html lang="en" xmlns:th="http://www.thymeleaf.org">
<head>
    <meta charset="UTF-8">
    <title>Title</title>
</head>
<body>
    <h1>成功!</h1>
    <!--th:text 将div里面的文本内容设置为 -->
    <div th:text="${hello}">这是显示欢迎信息</div>
</body>
</html>
@Configuration
public class WebConfig extends WebMvcConfigurerAdapter {
//所有的WebMvcConfigurerAdapter组件都会一起起作用
@Bean //将组件注册在容器
public WebMvcConfigurerAdapter webMvcConfigurerAdapter(){
WebMvcConfigurerAdapter adapter = new WebMvcConfigurerAdapter() {
@Override
public void addViewControllers(ViewControllerRegistry registry) {
registry.addViewController("/").setViewName("forward:/home/index");
registry.addViewController("/index.html").setViewName("forward:/home/index");
}
};
return adapter;
}
}
@Controller
@RequestMapping("/home")
public class HomeController {
@RequestMapping("/index")
public String index(Map<String,Object> map) {
map.put("hello","你好啊");
Person person = new Person();
person.setName("zhangsan");
person.setAge(25);
map.put("person",person);
return "home/index";
}
}
<body>
    <h1>成功!</h1>
    <!--th:text 将div里面的文本内容设置为 -->
    <div th:text="${hello}">这是显示欢迎信息</div>
    <br>

    <p>姓名:<span th:text="${person.name}"></span></p>
    <p>年龄:<span th:text="${person.age}"></span></p>
</body>
3.4.2 选择变量表达式
<p>==========选择变量表达式===========</p>
<div th:object="${person}">
    <div th:text="*{name}"></div>
    <div th:text="*{age}"></div>
</div>
<p>==========选择变量表达式===========</p>
<div >
    <div th:text="*{person.name}"></div>
    <div th:text="*{person.age}"></div>
</div>
3.4.3 url表达式
<p>==========Url表达式===========</p>
<div >
    <!--相对路径-->
    <a th:href="@{'person?name='+${person.name}}" >地址1</a>
    <!--相对于项目的根路径-->
    <a th:href="@{'/person?name='+${person.name}}" >地址2</a>
</div>
<script th:src="@{'/asserts/js/index.js'}"></script>
3.4.4 内置对象
3.4.5 工具对象
3.4.6 thymeleaf模板片段与布局页
<html xmlns:th="http://www.thymeleaf.org">
<body>
<span th:fragment="copyright">© 2019 <strong>xxx公司</strong></span>
</body>
</html>
<!--th:include-->
<div th:include="fragment/footer :: copyright"></div>
<!--th:replace 直接替换-->
<div th:replace="fragment/footer :: copyright"></div>
<!--th:insert 把html插入到内部-->
<div th:insert="fragment/footer :: copyright"></div>
<dependency>
<groupId>nz.net.ultraq.thymeleaf</groupId>
<artifactId>thymeleaf-layout-dialect</artifactId>
<version>2.2.2</version>
</dependency>
<!DOCTYPE html>
<html xmlns:layout="http://www.w3.org/1999/xhtml">
<head>
<meta charset="UTF-8">
<title>Title</title>
</head>
<body>
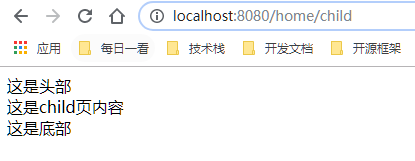
<header>这是头部</header>
<div layout:fragment="content"></div>
<footer>这是底部</footer>
</body>
</html>
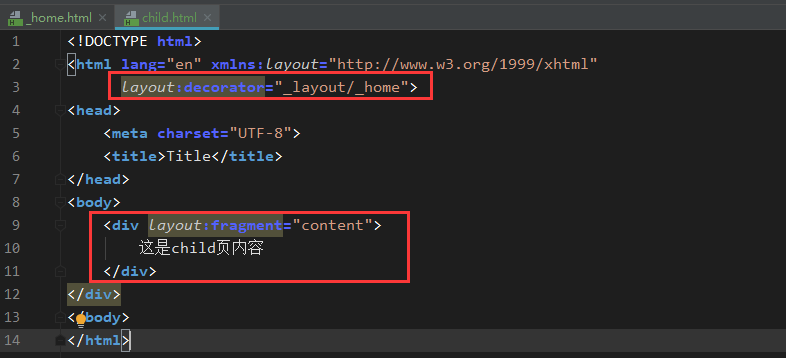
<!DOCTYPE html>
<html lang="en" xmlns:layout="http://www.w3.org/1999/xhtml" layout:decorator="_layout/_home">
<head>
    <meta charset="UTF-8">
    <title>Title</title>
</head>
<body>
    <div layout:fragment="content">
        这是child页内容
    </div>
</div>
</body>
</html>
四、总结
相关文章
暂无相关文章
用户点评